
Tutorial – Taking high-res blog snapshots for intermediate users
A few friends have been requesting that I do a tutorial outlining the steps I go through when working on pictures for my blog and Flickr photostream. I have decided to split up the tutorials because of the amount of information I ended up wanting to share. The tutorials will address intermediate-level photographers and will strictly revolve around the setup and execution of picture-taking for fashion bloggers.
You can find all of the tutorials on my tutorials page.
Beginners can refer to the ‘Taking Snapshots’ tutorial on secondlifebasics.com.
Please note that I am no expert, nor have I ever received any specialized training. I can only offer advice, suggestions and tips that I have picked up along the way from other wonderful bloggers through my two+ years of fashion blogging. If you see any mistakes in any of the information I have provided below or feel that you can add more to my explanation please feel free to leave it in the comments section. Thank you.
Keep in mind that in order to run Second life and then be able to take a very high quality image, your system should be as close to the system requirements recommended on the Second Life website as possible.
This tutorial will cover:
- Graphics Settings
- Anisotropic Filtering
- Screen Resolution
- Advanced Menu
- Setting the Scene
- Windlight Settings
Graphics Settings

Before you open up your image editing program (e.g. Photoshop) the first thing you want to do is take a snapshot that will be of the highest possible quality that your computer can handle.
‘How I go about doing that?’, you ask. Simple. You want to take a look at your graphics settings in Second Life.
- If you are using viewer 1.23 they will be in the ‘Edit’ menu under ‘Preferences’ (Edit > Preferences).
- If you are using viewer 2.0 they will be in the ‘Me’ menu under ‘Preferences’ (Me > Preferences).
Make sure the sliders are as close to the “Ultra” as you can possibly get them without it making you crash or lag.
Currently I am running Windows 7 and my video card is Nvidia Geforce 7800 GT w/256MB. With that, I can easily keep my graphics on Ultra all the time without too much lag, except if I am in an incredibly laggy sim.
» This is a great YouTube video by Torley Linden detailing all the aspects of the graphics settings, including anisotropic filtering.
Anisotropic Filtering

What is Anisotropic filtering? Well it’s basically just another way of enhancing your image quality as long as your system can handle it. The most important part about this option is the antialiasing. Antialiasing renders a scene at a bigger size, then scales it down, making edges smoother and more precise.
Your Anisotropic filter setting is nested in your graphics preferences:
Edit > Preferences > Graphics tab > Hardware Options button, Filtering check box
Once you have clicked the Hardward Options button (bottom right of Graphics tab window) a new window will pop open with your Hardware Settings.
In Hardware Settings, to activate your antialiasing and get rid of the jagged edges when taking pictures, adjust:
- Filtering: Ensure that check box here is selected/active.
- Antialiasing: Move from the disabled position to 2x, 4x, 8x, 16x – this is dependent on the capacity of your graphics card. For the average person, 4x will suffice.
Click ‘OK’.
I admit to not always using antialiasing in my pictures because it slows down my computer quite a bit and makes me crash … or just makes my whole screen black, resulting in a need to reboot in order to fix it.
You may want to systematically go through each Antialiasing magnification (“x”) setting one-by-one, starting with 2x, to see which is best suited to your computer.
Most people will notice that after 4x they can barely notice any difference at all. This option will greatly assist you in getting rid of the jagged edges on your avatar – especially when doing closeups for skin reviews.
Don’t forget! Once you’re all done taking photos, go back and uncheck the filtering button and reduce your graphics back to your usual settings, since you won’t need high resolution for day-to-day activities.
Screen Resolution

Settings aside, now is the time to focus on the big picture.
To ensure a quality image, the snapshot you take should be at least 2 to 3 times greater than your computer screen resolution. The more the better.
For example:
- My screen resolution is: 1440 × 900
- I shoot photos at: 4000 x 2355 or 5000 x 2944
The higher the resolution, the better quality your picture. Reducing the image size will create visuals with jagged edges.
Advanced Menu
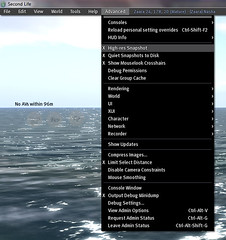
Another option for improving your image quality is located in the ‘Advanced’ Menu.
To activate your Advanced menu, you must simultaneously press your Ctrl+Alt+D keys. Once pressed, you will notice that another top menu option will appear at the end of your top menu bar.
In the Advanced menu you will make sure that “High-res Snapshot” is checked (indicated by an “X” to show as active).
Note: You can also check “Quiet Snapshots to Disk” which will turn off the snapshot sound effect, allowing you to take photos quietly and discreetly. Activating the Quiet Snapshots to Disk feature does not affect the quality of your picture.
Setting the Scene
Keep in mind that it’s not just about ensuring you have the optimum graphics and resolution settings, and then hitting the snapshot button (Ctrl+Shift+S) and *voila!* you’re done. If you put a little time and thought into the planning of the picture before hitting the snapshot button, your efforts will really show in the composition of your final product.
When I decide on an outfit or look that I want to shoot, I first think about how blog readers will experience it. I may ask myself if I want to shoot it on a plain white background – which is fabulous for blogging because you really do want the outfit to show up appropriately and stand out. However, after a while that can get a bit boring and it might not keep your audience as interested or excited about what you are trying to show them.
So I might try to find a sim to shoot at that might go with the theme of the outfit I am wearing. Or sometimes I go on xstreet to look for an interesting texture to use as a background which can really make things pop and a little less boring.
Once I’ve decided on location and background, I pick the pose and/or furniture and decor that would best suit my look and make the pictures more exciting and come to life.
Whatever I do decide to do in the end, I want to make sure it is not overpowering or taking away from the outfit. Because after all, as a fashion blogger, my main goal is to let the outfit speak for itself.
Windlight Settings
WindLight is a revolutionary atmospheric lighting and rendering system within Second Life that can assist photographers of all skill levels to create stunning visuals. What does that all mean? You have a powerful mood-setting tool at your disposal. Take advantage of it!
- Second Skin Labs Downloads
These are the windlight settings I have downloaded and installed. This is a great download because it consists of all the best settings out there all in one file which you just click and it installs itself without much fuss. - Windlight Wiki Page
More information about Windlight, an introduction and FAQs
Due to the creativity and generosity of many members of our photography community, you have a selection of resident-created Windlight presets to choose from and experiment with. Many have made their presets available for download or shared some tricks and tips on their blogs.
Here are some Windlight resources that I have found to be very useful:
To conclude, once you have decided on your look, set up the scene, increased your graphics settings and chosen the perfect Windlight preset go ahead and hit that Snapshot button!
For now, sit tight until next tutorial tomorrow: cleaning up your pictures using Photoshop.
Thanks for reading! <3
» You can view all of my current tutorials and see coming titles on my tutorials page.
Thanks so much for this wonderful tutorial. I have been wanting to start blogging again. This tutorial and the ones you have planned are just what I need for inspiration and motivation!
Really awesome guide– will bookmark it to pass on…A LOT…if only I could have found out half of this stuff a lot sooner- it took me nearly a year to piece together what you have brilliantly explained here- really great job xx
These are things I already do for SL photography but I wanted to pop in and say you did a *great* job explaining how it’s done.
As someone who has just begun to dabble in Photoshop, tomorrow’s installment will be sure to be a learning experience. Thank you!
Thank you great tutorial.
I’ll try it~~(^^)v
Great post, Berry. Thanks very much for sharing.
Thanks so much for this great tutorial.
I can’t wait to try it!!! 🙂
Thank you so much everyone for your comments. It really feels good to know that people are finding this useful. <3
Thanks so much for this wonderful tutorial. I have been wanting to start blogging again. This tutorial and the ones you have planned are just what I need for inspiration and motivation!
Very helpful, thank you
Dear Stanky… I thought I was going insane… I just couldnt get the quality I used to out of my shoots… then I read this and its all better again… thank you… please be the mother of my bunneh babys
Pingback: Tutorial – Dodge and Burn in Photoshop | StrawberrySingh.com
Pingback: Tutorial – Kirstens Viewer Shadows | StrawberrySingh.com
Pingback: metavirtual.us- A fashion, business, technical, tutorial, grid, general, and community Second Life blog feed
I wanted to stop by and say thank you for your awesome tutorial(s). It’s funny that I’ve been doing snapshots in-world for so long and hadn’t tried many of the tips you provide here. Well, I decided to try for my latest blog entry and they helped tremendously! Next up is Kristen’s Viewer build 42 because your tut for that was so great.
Thanks again for taking the time to do write ups like this 🙂
wow! Just found these tutorials. 🙂 Better late than never! 😀
Thank you, thank you!
Pingback: Summer Relaxation — Me Praticing Photography « ||SL Style Check||
Awesome tutorials! Maybe you could do one on how to make a picture looks soft and more realistic rather than being pixellated! (:
Nos, ez az első nézd meg a blog! Mi vagyunk a csoport az önkéntesek és a kezdő egy teljesen új kezdeményezés, hogy egy regionális közösség pontosan ugyanazon niche. A blog szolgáltatott számunkra értékes információt dolgozni. Tettél egy csodálatos feladat!
Pingback: Opinion Post: Please Stop That! « HarlowHeslop.com
Pingback: So you wanna be a Blogger? « {Funny Shoop}
Hi Berry,
Do you know how to change the width and height of a snapshot using viewer 3? I used to know how to do this (there was a pull down tab on earlier viewers inside the snapshot freeze screen), but now I can’t seem to find where to make my resolution higher. My screen resolution is 1600 X 900 and its taking pictures at 1600 X 844 and I can’t seem to figure out how to change it in this new viewer.
Thanks =)
Hi Kirsten
When you hit that snapshot button in viewer 3, you should get the snapshot window pop up. From there you want to click on “Save to my computer” and you’ll arrive at the next window. In the next window you will see the drop down option and you can choose from “current window” to a bunch of other resolutions or “custom”
I always choose “custom” and then I’m able to input my desired resolution.
Hope that helps!
Pingback: Back to the Drawing Board | Cheep & ChiChi
Fabulous! Thank you so much for this tutorial. I’ve been trying to get better with my blogging photography. One thing I did note, however, is that this link – http://www.secondskinlabs.com/Downloads/downloads3.html – may be broken. It just hangs and doesn’t do anything.
Pingback: Back to the Drawing Board | dreamingofhoopoes
Pingback: Five of My Favorite Second Life Blogs | Cheap Land
Pingback: Halloween Photo Contest | The Virtual World Educator
Pingback: Holiday Photo Contest | The Virtual World Educator
Pingback: Valentine’s Photo Contest | The Virtual World Educator
Pingback: Spring Photo Contest | The Virtual World Educator
Pingback: Tutorial - Photography for beginners - Mesh Body Addicts
Strawberry Singh, what a fantastic post! That is such a detailed article, I can`t wait to dig deep and start utilizing the resource you have given me! Thanks for sharing it!
Pingback: Basics. – Virtual SLifestyles
Pingback: Halloween Photo Contest | The Virtual World Educator
Pingback: Holiday Photo Contest 2018 | The Virtual World Educator
Pingback: Photography in SL – The Second Life of Pylia